Double Infinity Looped Wire Ring Tutorial
I’m really excited about this new wire ring tutorial.
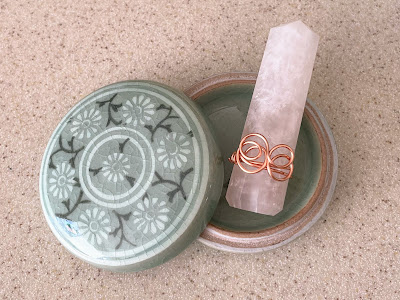
It uses one technique, but I’ve managed to make two different ring styles by turning the wire focal horizontal in one version and vertical in the other. This tutorial will show you how to make the vertical double infinity wire ring, as well as describe some of the differences in the horizontal version.
The materials I used for this ring are 12 inches of 18 gauge wire (I used copper for the horizontal version and gold color for the vertical).
You will need basic wire wrapping tools of wire flush cutters and chain nose pliers.
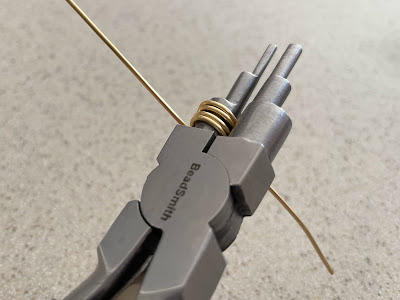
Starting about 3 inches from one end of the wire, use the 7 mm mandrel of the 6 step looping pliers to make a coil with four loops. Your coil should look like the picture above, with four loops on the pliers mandrel and the wire ends pointing in opposite directions.
Remove the coil from the mandrel.
Using your finger nails or the chain nose pliers, gently separate the coils. Press the first coil on each side away from each other until they are flat.
Repeat with the next two coil loops. The resulting shape is a double figure 8 or double infinity symbol. The other two wires will be straight out the side so you can make the ring shank.
Wrap each wire around the ring mandrel one size smaller than you want the finished ring to be. Wrap the wire so each side just passes under the double loop center of the ring.
Put the ring back on the mandrel at the size you would like it to be. Bend the wire ends up in a right angle where you would like to make the wraps to secure the ends.
Holding the wire to maintain the size, leave a little room to pass the wire end around the ring shank to secure it. I usually wrap it around two times to secure it in place.
I always find it easiest to wrap with in a small space with a shorter tail end, so you may want to trim the end to about 1 inch in length. You can use chain nose pliers to help wrap the wire in place.
Repeat these steps to secure the wire on the other side.
I had trouble getting my rings to be the correct size – they kept shrinking when I was securing the tail wires. You may want to place the ring back on the mandrel to make size adjustments before securing the second tail wire.
Luckily rings like these are slightly forgiving on the size. You can stretch them a bit on the mandrel and when the wire band is thin, the size is a bit more forgiving as long as you can get the ring over your knuckle (at least that’s how it is for me).
Trim and tuck the wire ends and file them with an emery board or metal file. Try on your ring for size (and hope it fits!).
When I made the horizontal version of the ring, I cut one tail under the first loop and used the other one to make the ring shank. That meant there is only one wrap on the ring shank but the loop centerpiece was not secured to the ring shank.
Since this was a new design / prototype, I used a small piece of 24 gauge wire to secure it to the ring shank.
Because of the size of the wire loops, both wire wraps around the ring shank are barely noticeable since they tuck in next to my fingers. I wear about a size 7.5 ring. I mention it because the results might be a little different for you depending on your ring size.
In the end, I may like the vertical orientation of the ring a little better and I think it’s probably a little easier to make. Which one do you like? and why?
Want to know when I post new free projects and tutorials? The ONLY reliable way is to sign up for my new email newsletter.


